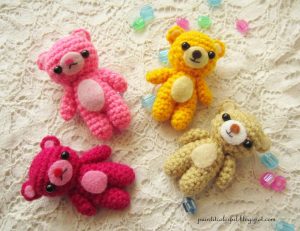
Hello lovelies! I love making amigurumi dolls but i don’t have enough patience to make larger ones so i always end up making little amigurumi projects. I guess there are people out there who, like me, would wish to make tiny amigurumi dolls that don’t consume lots of time. Then this is a perfect project for you to try. These tiny bears measures only around 2.5 inches. Do go ahead and check out the pattern below to make these little teddy bears:)
R1: 6 sc in magic ring (6)
R2: 2sc in each st (12)
R3: *sc in next st, 2sc in next st* rep **(18)
R4: *sc in next 2 st, 2sc in next st*, rep ** (24)
R5-7: sc in each stitch (24)
R8: *sc in next 2 st, dec 1 in next st*, rep **(18)
R9: *sc in next st, dec 1 in next st*, rep** (12)
R10: *sc in next 2 st, dec 1 in next st*, rep ** (9)
Fasten off leaving a long tail for sewing.
Leg: (Make 2)
R1: 4sc in magic ring (4)
R2: 2 sc in each stitch (8)
R3-5: sc in each stitch (8)
fasten off the yarn in first leg but do not cut off the yarn in the second leg.
Stuff both legs.
body:
Hold both legs together and sl st the second leg to the other one,
R1: sc around (16)
R2: sc around (16)
R3: *sc in next 2 st, dec 1 in next st*, rep ** (12)
R4-5: sc in each stitch (12)
R6: *sc in next 2 st, dec 1 in next st*, rep ** (9)
Fasten off and sew in the edges.
NOTE: after stuffing, the legs will seem to be slightly apart (like inverted v shape). In order to make the legs together, with the remaining yarn from the first leg, sew both the legs together at the inner side. This will give a nice finished look)
Hands: (Make 2)
R1: 4sc in magic ring (4)
R2: *sc in next st, 2sc in next st*, rep ** (6)
R3-5: sc in each stitch (6)
Fasten off leaving a long tail for sewing.
Assembling:
Sew the head to the body and attach both hands to the body using tapestry needle.
Sew in both ears to the head.
Cut a small oval shape felt and glue it to the body.
Cut 2 small half circle felt and glue it to the inner ears
Cut another small oval shape for snout and embroider the mouth and nose to your liking.
Sew in eyes closer to the snout using small black beads.
Note:
Alternatively, you can crochet small oval shapes for the body and snout instead of felt.
Your little teddy bear is done!
Materials needed:
Acrylic yarn in colors of your choice
Crochet Hook according to the size of your yarn
Little felt for belly and mouth
Tapestry needle
Black beads or safety eyes
Black embroidery thread
This project is worked in continuous rounds unless stated otherwise
sc -single crochet
st- stitch
dec- one single crochet decrease
sl st – slip stitch
R1: 6 sc in magic ring (6)
R2: 2sc in each st (12)
R3: *sc in next st, 2sc in next st* rep **(18)
R4: *sc in next 2 st, 2sc in next st*, rep ** (24)
R5-7: sc in each stitch (24)
R8: *sc in next 2 st, dec 1 in next st*, rep **(18)
R9: *sc in next st, dec 1 in next st*, rep** (12)
R10: *sc in next 2 st, dec 1 in next st*, rep ** (9)
Fasten off leaving a long tail for sewing.
Leg: (Make 2)
R1: 4sc in magic ring (4)
R2: 2 sc in each stitch (8)
R3-5: sc in each stitch (8)
fasten off the yarn in first leg but do not cut off the yarn in the second leg.
Stuff both legs.
body:
Hold both legs together and sl st the second leg to the other one,
R1: sc around (16)
R2: sc around (16)
R3: *sc in next 2 st, dec 1 in next st*, rep ** (12)
R4-5: sc in each stitch (12)
R6: *sc in next 2 st, dec 1 in next st*, rep ** (9)
Fasten off and sew in the edges.
NOTE: after stuffing, the legs will seem to be slightly apart (like inverted v shape). In order to make the legs together, with the remaining yarn from the first leg, sew both the legs together at the inner side. This will give a nice finished look)
Hands: (Make 2)
R1: 4sc in magic ring (4)
R2: *sc in next st, 2sc in next st*, rep ** (6)
R3-5: sc in each stitch (6)
Fasten off leaving a long tail for sewing.
Ears: (Make 2)
6sc in mc
Fasten off leaving a long tail for sewing.
Assembling:
Sew the head to the body and attach both hands to the body using tapestry needle.
Sew in both ears to the head.
Cut a small oval shape felt and glue it to the body.
Cut 2 small half circle felt and glue it to the inner ears
Cut another small oval shape for snout and embroider the mouth and nose to your liking.
Sew in eyes closer to the snout using small black beads.
Note:
Alternatively, you can crochet small oval shapes for the body and snout instead of felt.
Your little teddy bear is done!
Attach a small thread or lanyard at the top of head and your teddy can be used as keychain or bag charm.
Hope you guys like the pattern. Have fun craftting!


