Hello dear Amigurumi Followers
Today we share one free amigurumi crochet pattern again for you. As you know we share new amigurumi free patterns every day. The main crochets are amigurumi gazelles, amigurumi bears, amigurumi pola, amigurumi pandas, amigurumi penguins, amigurumi giraffes, amigurumi llama, amigurumi pigs, amigurumi bunny, amigurumi clowns, amigurumi lambs, amigurumi bees, amigurumi unicorns, amigurumi dolls, amigurumi foxes, amigurumi penguins, amigurumi dinosaurs, amigurumi elephants, amigurumi hippos, amigurumi monkeys, amigurumi cats, amigurumi dogs and more …
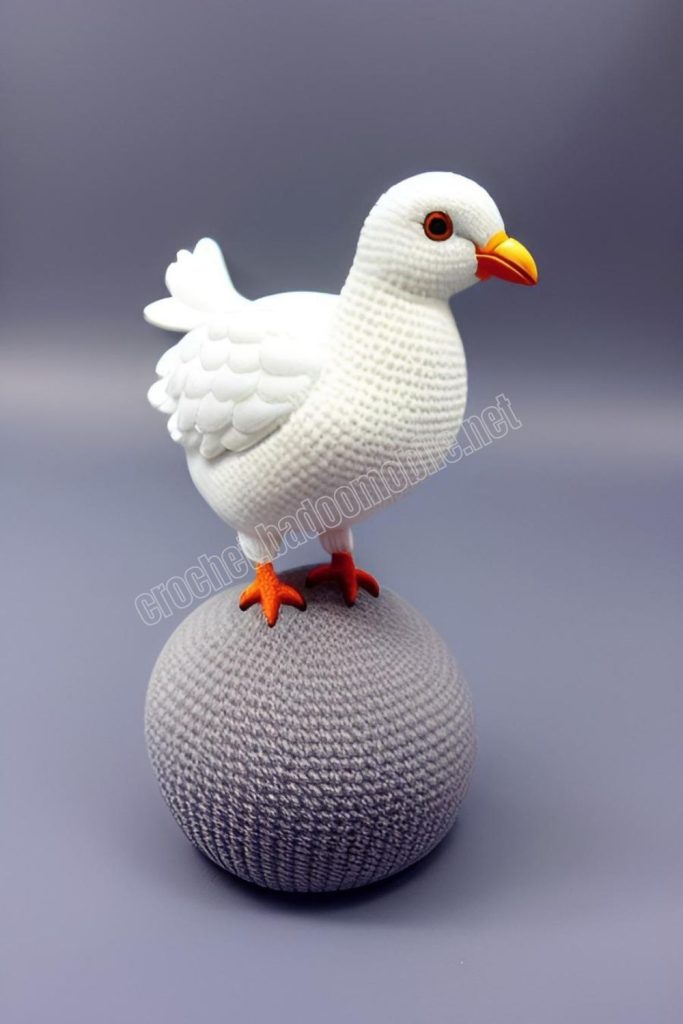
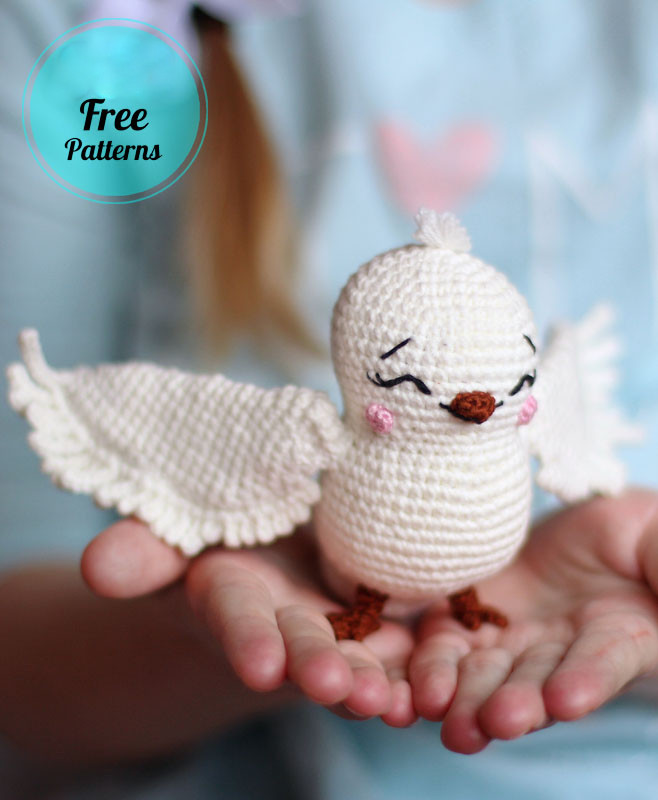
Todays daily new amigurumi free crochet pattern is Amigurumi Dove of Peace.
I want to give you some informations about this pattern ;
Materials and tools
– Hook 1,75 mm (for crocheting dove), hook 1,5 mm (for crocheting cheeks, beak, feet and olive branch);
– Black, brown, pink, light and dark green threads mouline;
– Pin or marker;
– Needles for cutting – with a bead on the end (for fixing parts before sewing);
– Synthepus for filling;
– Yarn needle (thick needle with blunt end);
– Scissors;
– Needle;
– Floral wire, diameter 0.95 mm; expense 45 см – 17.7 inches (optional – for movable wings and olive branch);
– Super Glue “Moment”.
CONVENTIONS
l – loop=chain;
sc – single crochet;
sl st – slip stitch;
dc – double crochet;
inc – increase;
dec – decrease;
(…l) – total number of loops in a round;
[…]xN – repeat what is indicated in round brackets N times.
Amigurumi Dove of Peace Free Pattern:
HEAD and BODY (Yarn A)
1: 2 loops, 6sc in 2nd loop from hook (amigurumi ring) (6l)
2: [inc]х6 (12l)
3: [sc, inc]х6 (18l)
4: [2sc, inc]х6 (24l)
5: [3sc, inc]х6 (30l)
6: [4sc, inc]х6 (36l)
7: [5sc, inc]х6 (42l)
8-14: 42sc (42l)
15: [5sc, dec]х6 (36l)
16: [4sc, dec]х6 (30l)

Embroider black thread auxiliary line from the center of the first round to the 7th loop of the last round (count anticlockwise from the beginning of the round, see photos 1, 2).
Embroider eyes with black thread floss between the rounds 12 and 13 (symmetrically from auxiliary line), the distance between them is approximately 6 stitches (see photo 3-5).
Divide black mouline threads in half embroider eyelashes and brows (see photos 6- 9).

BEAK (Brown mouline threads)
Crochet beak with a hook 1,5 mm!
1: 2 loops, 6sc in 2nd loop from hook (amigurumi ring) (6l)
2: 6sc (6l)
Cut and fix the thread, leaving a long end for sewing. Sew the beak to the head below 12 round (see photo 10). Divide black mouline threads in half make a long horizontal stitch for a smile (see photo 11). Fasten it with a needle to fix the resulting smile from three points (see photos 13-15).

CHEEKS 2 pcs (Pink threads mouline)
Crochet cheeks with a hook 1,5 mm.
1: 2 loops, 6sc in 2nd loop from hook (amigurumi ring), sl st in 1st sc (6l)
Cut and fix the thread, leaving a long end for sewing. Sew the cheeks to the head with the wrong side outward. Remove an auxiliary line (see photos 16-18).

FORELOCK (Yarn А)
Forelock positioned in the center of the 1st round of the head. Insert the needle and pull out the thread, then insert it in the same place. Do not tighten the thread to the end, but leave a 0,5 cm (0,2 inches) long «loose stitch» (see photo 19).
Secure the «loose stitch» from the wrong side, making a knot. Make another 4 loops in the same way (see photo 20). Cut the loops with scissors, make the desired shape and brush (see photo 21).

Continue crochet the body.
17: 30sc (30l)
18: [4sc, inc]х6 (36l)
19: [5sc, inc]х6 (42l)
Stuff the head with synthepus.
20: 13sc, 4 loops, turning, 3 sl st starting from the 2nd loop from the hook, sl st in the same loop (in which the last sc was crocheted before 4 loops), 29sc (48l) (see photos 22-24)

21: 48sc (48l)
22: 16sc, 4 loops, turning, 3 sl st starting from the 2nd loop from the hook, sl st in the same loop, 32sc (54l) (see photo 25)
23-25: 54sc (54l)
26: 20sc, 4 loops, turning, 3 sl st starting from the 2nd loop from the hook, sl st in the same loop, 34sc (60l) (see photo 26)
27: 60sc (60l)
28: [4sc, dec]х2, 24sc, [4sc, dec]х4 (54l)
29: [3sc, dec]х2, 24sc, [3sc, dec]х4 (48l)
30: [2sc, dec]х2, 24sc, [2sc, dec]х4 (42l)
31: [sc, dec]х2, 24sc, [sc, dec]х4 (36l)
32: [dec]х2, 24sc, [dec]х4 (30l)
Start stuffing the body with synthepus.
33: [2sc, dec]х3, 6sc, [2sc, dec]х3 (24l)
34: [sc, dec]х3, 6sc, [sc, dec]х3 (18l)
35: [sc, dec]х6 (12l)
Fill the body to the end.
36: [dec]х6 (6l)
Trim the thread. Pass the thread through all the loops using the yarn needle. Tighten and secure (see photo 27).

TAIL (Yarn А)
1: 13 loops, turning, sl st starting from the 2nd loop from the hook, 3 loops, turning, 2 sl st starting from the 2nd loop from the hook, sl st in the same loop (see photos 28- 31); sl st, 5 loops, turning, 4 sl st starting from the 2nd loop from the hook, sl st in the the same loop]x8; 5 loops, turning, 4 sl st starting from the 2nd loop from the hook, sl st in the same loop; 3 loops, turning, 2 sl st starting from the 2nd loop from the hook, sl st in the same loop. Next crochet from the back of the chain: [sc, dec]x4 (see photo 32).
Pin the feathers to the fabric with the needles for cutting and steam with an iron (see photos 33, 34). Sew the tail to the body (see photos 35, 36).

FEET, 2 pcs
Crochet feet with a hook 1,5 mm and brown threads floss.
1: 2 loops, 6sc in 2nd loop from hook (amigurumi ring), sl st in 1st sc (6l)
2: Crochet all round only through front loops – 3 loops, turning, 2 sl st starting from
the 2nd loop from the hook (1st finger); 2 sl st; 3 loops, turning, 2 sl st starting from
the 2nd loop from the hook (2nd finger); sl st; 4 loops, turning, 3 sl st starting from
the 2nd loop from the hook (3rd finger); sl st; 3 loops, turning, 2 sl st starting from
the 2nd loop from the hook (4th finger); 2 sl st (see photos 37-41)

3: Flip (see photo 42). Pull the loop to the wrong side (see photo 43). Crochet all round only through back loops remaining from the previous round – [sc, dec.]x2 (4l) (see photo 44)

4: [sc, inc]х2 (6l)
5: 6sc (6l)
Cut and fix the thread, leaving a long end for sewing (see photo 45). Sew the feet to the body so that the resting is not only on them, but also on the tail to make the toy stable (see photos 46-48).

WINGS (Yarn A)
1: 2 loops, 6sc in 2nd loop from hook (amigurumi ring) (6l)
2: 2sc, [inc]х2, 2sc (8l)
3: 3sc, [inc]х2, 3sc (10l)
4: 4sc, [inc]х2, 4sc (12l)
5: 5sc, [inc]х2, 5sc (14l)
6-7: 14sc (14l)
8: 6sc, [inc]х2, 6sc (16l)
9-10: 16sc (16l)
11: 7sc, [inc]х2, 7sc (18l)
12-13: 18sc (18l)
14: 8sc, [inc]х2, 8sc (20l)
15-16: 20sc (20l)
17-20: dec, 7sc, [inc]х2, 7sc, dec (20l)
21: [dec]х4, 4sc, [dec]х4 (12l)
22: [dec]х2, 4sc, [dec]х2 (8l)
Cut and fix the thread, leaving a long end for sewing. Don’t close the hole (see photo 49).
PLUMAGE 1: 23 loops, turning, [7 loops, turning, 6 sl st starting from the 2nd loop from the hook, sl st in the same loop]x8; [5 loops, turning, 4 sl st starting from the 2nd loop from the hook, sl st in the same loop]x7; [3 loops, turning, 2 sl st starting from the 2nd loop from the hook, sl st in the same loop]x7
The plumage for the right wing (from the observer) will be directed in the wrong direction. Therefore, it is necessary to pin the feathers with the needles for cutting to the fabric in the right direction and steam them with an iron (see photo 50, 51). Sew the plumage to the wings (see photo 52).
Mark with the needle for cutting the location of the wings between 19 and 20 round of the body, the distance between them is approx 22 stitches (see photo 53)
WIRE FRAME TO THE WINGS
Insert the yarn needle into the body at the wings attachment point. Take a piece of wire (approximately 40 cm – 15.7 inches long). Pull the wire through the body use a needle (see photos 54, 55). Pull the crocheted wings to the wire (see photo 56).
Bite off excess wire and bend the end into a “loop” using round-nose pliers (see photo 57). Additionally sew the tips of the wings to prevent wire end from protruding out (see photo 58). Sew the wing to the body (see photos 59, 60). If you are not using wire sew the wings to the body in the same way.

OLIVE BRANCH
Crochet all details for the branch with a 1,5 mm hook.
LEAVES, 6 pcs (Dark green mouline threads)
1: 5 loops, turning, sl st starting from the 2nd loop from the hook, sc, dc, sl st (4l)
Cut and fix the thread, leaving a very long end for the one leave (see photo 61).

OLIVES, 3 pcs (Black or light green mouline threads)
1: 2 loops, 3sc in 2nd loop from hook (amigurumi ring), sl st in 1st sc (3l)
Cut and fix the thread (see photo 62). Cut off a piece of a wire 5 cm (2 inches) long.
Wind the wire with the long end of the thread of one of the leaves, adding other details in the process (see photos 63-65). Cut and secure the thread with superglue (see photo 66).
More Amigurumi Dove Ideas: